
RipteqSQL Introduction
Introduction
RipteqSQL is a simple application designed to generate code files based on an existing database schema. At this stage, it only supports SQL Server (SQL Server and SQL Azure), however we will add more database types over time.
Install: Windows Store Link

Problem Statement
There are many ways applications store data. The most common is via a database. A popular method for applications to work with a database is by using code models, and having a layer of the application work with the database to perform CRUD (Create, Read, Update and Delete) operations. You can hand code these integrations, however most people use an ORM (Object Relational Mapper).
There are many popular ORMS, however most have a requirement for a code model representation of the database schema (tables and views). You may choose to hand craft these code models, and have your application build the database from the code, or you can have an existing database and build code models that represent the tables and views. If your existing database is large, or is constantly changing, keeping your code models in sync with your database schema can be difficult and prone to error. It’s also time consuming.
RipteqSQL will geenrate these code models based on an existing database schema, as well as other useful tasks.
Getting Started
When you open the application, you can see there are 3 main areas. Projects, Databases and Templates. Basically, you create a Project that uses a Database and a Template. Once these are configured, you can generate the code files at any time (and as many times as you like).
Projects can be grouped into Solutions so that you can perform code generation on the entire solution in one operation. For example, you might have many projects within a code solution that all require an update if the database schema changes. Rather than do this Project by Project, you can do this for all Projects within a Solution with one click.

Setup a Database Connection
Click on the left hand menu option ‘Databases’. This will show you all database connections setup in RipteqSQL. You can click the green + button to add a new connection, or click the ‘Computer Icon’ to edit an existing connection.
Type a ‘Name’ to identify the connection, then enter connection details (such as Server and Authentication Credentials).
You can test the connection from the dropdown button menu to see if this works.


Setup (or edit) a Template
Templates are used for code generation. They contain boilerplate code with placeholders that are replaced with information from both the Project, and Database Schema when generating code files.
You can create your own Templates, as well as import/share templates with others.

When editing or creating a template, the @ symbol represents a placeholder that is replaced with real information at the time of generation. When you type the ‘@’ symbol in the template editor, you will be presented with a searchable dropdown of available placeholders.
Special Mention Placeholders:
@Tab - this inserts a ‘Tab’ spacing into the code file
@ForEach @EndForEach - this is a loop. Within these tags, all fields within the table or view are inserted in order of the ordinal value.
Instructions
The Instructions tab is a place where you can include information about how the template can be used. This area is not included in the code generation, however you can still include @ placeholders. Within the project, if you select a table and click Instructions, the code generation is performed and shown in a preview window. This is handy if you want the instructions to include example code (for instance).


Project
The Project is where you combine the database connection and template so that code can be generated. Below is an explanation of the Project Settings.

Project: A name to identify the project
Solution: A way of grouping projects together
Connection: Choose from your library of database connections. This is a search box and only shows 10 results.
Name Space: The name space you would like to use for your generated class (@namespace)
Template: The code template you would like to use
File Extension: Your files will be generated with the name ‘Class Prefix + Table Name + Class Suffix’.’File Extension’. If you are developing a C# app, the file extension will be cs.
Output Folder: Choose where your files will be generated. Each generation will overwrite existing files (but will not delete any files already in the folder).
Class Prefix/Suffix: Used as a Class Name Prefix/Suffix (eg. a Table named Employess with Class Suffix Model, will be EmployeeClass)
Table Prefix/Suffix: Used to generate a model with a Table prefix/suffix option.
Multiple/Single File Output: In most cases you will generate a file per table/view. However, you can generate a giant single file if required.
Description: A description that can be used to describe the project
Schema Management
The second part of the project is the Schema Management. Once you have entered the project settings and saved the project, you can now Sync to the database connection and generate your project schema. Click the Save dropdown menu, and select Sync Project.

Now select the Schema Management tab, and you should see the tree of tables, external tables and views. You might need to refresh the view by clickin the filter button [1] if nothing appears. This will refresh the schema tree.
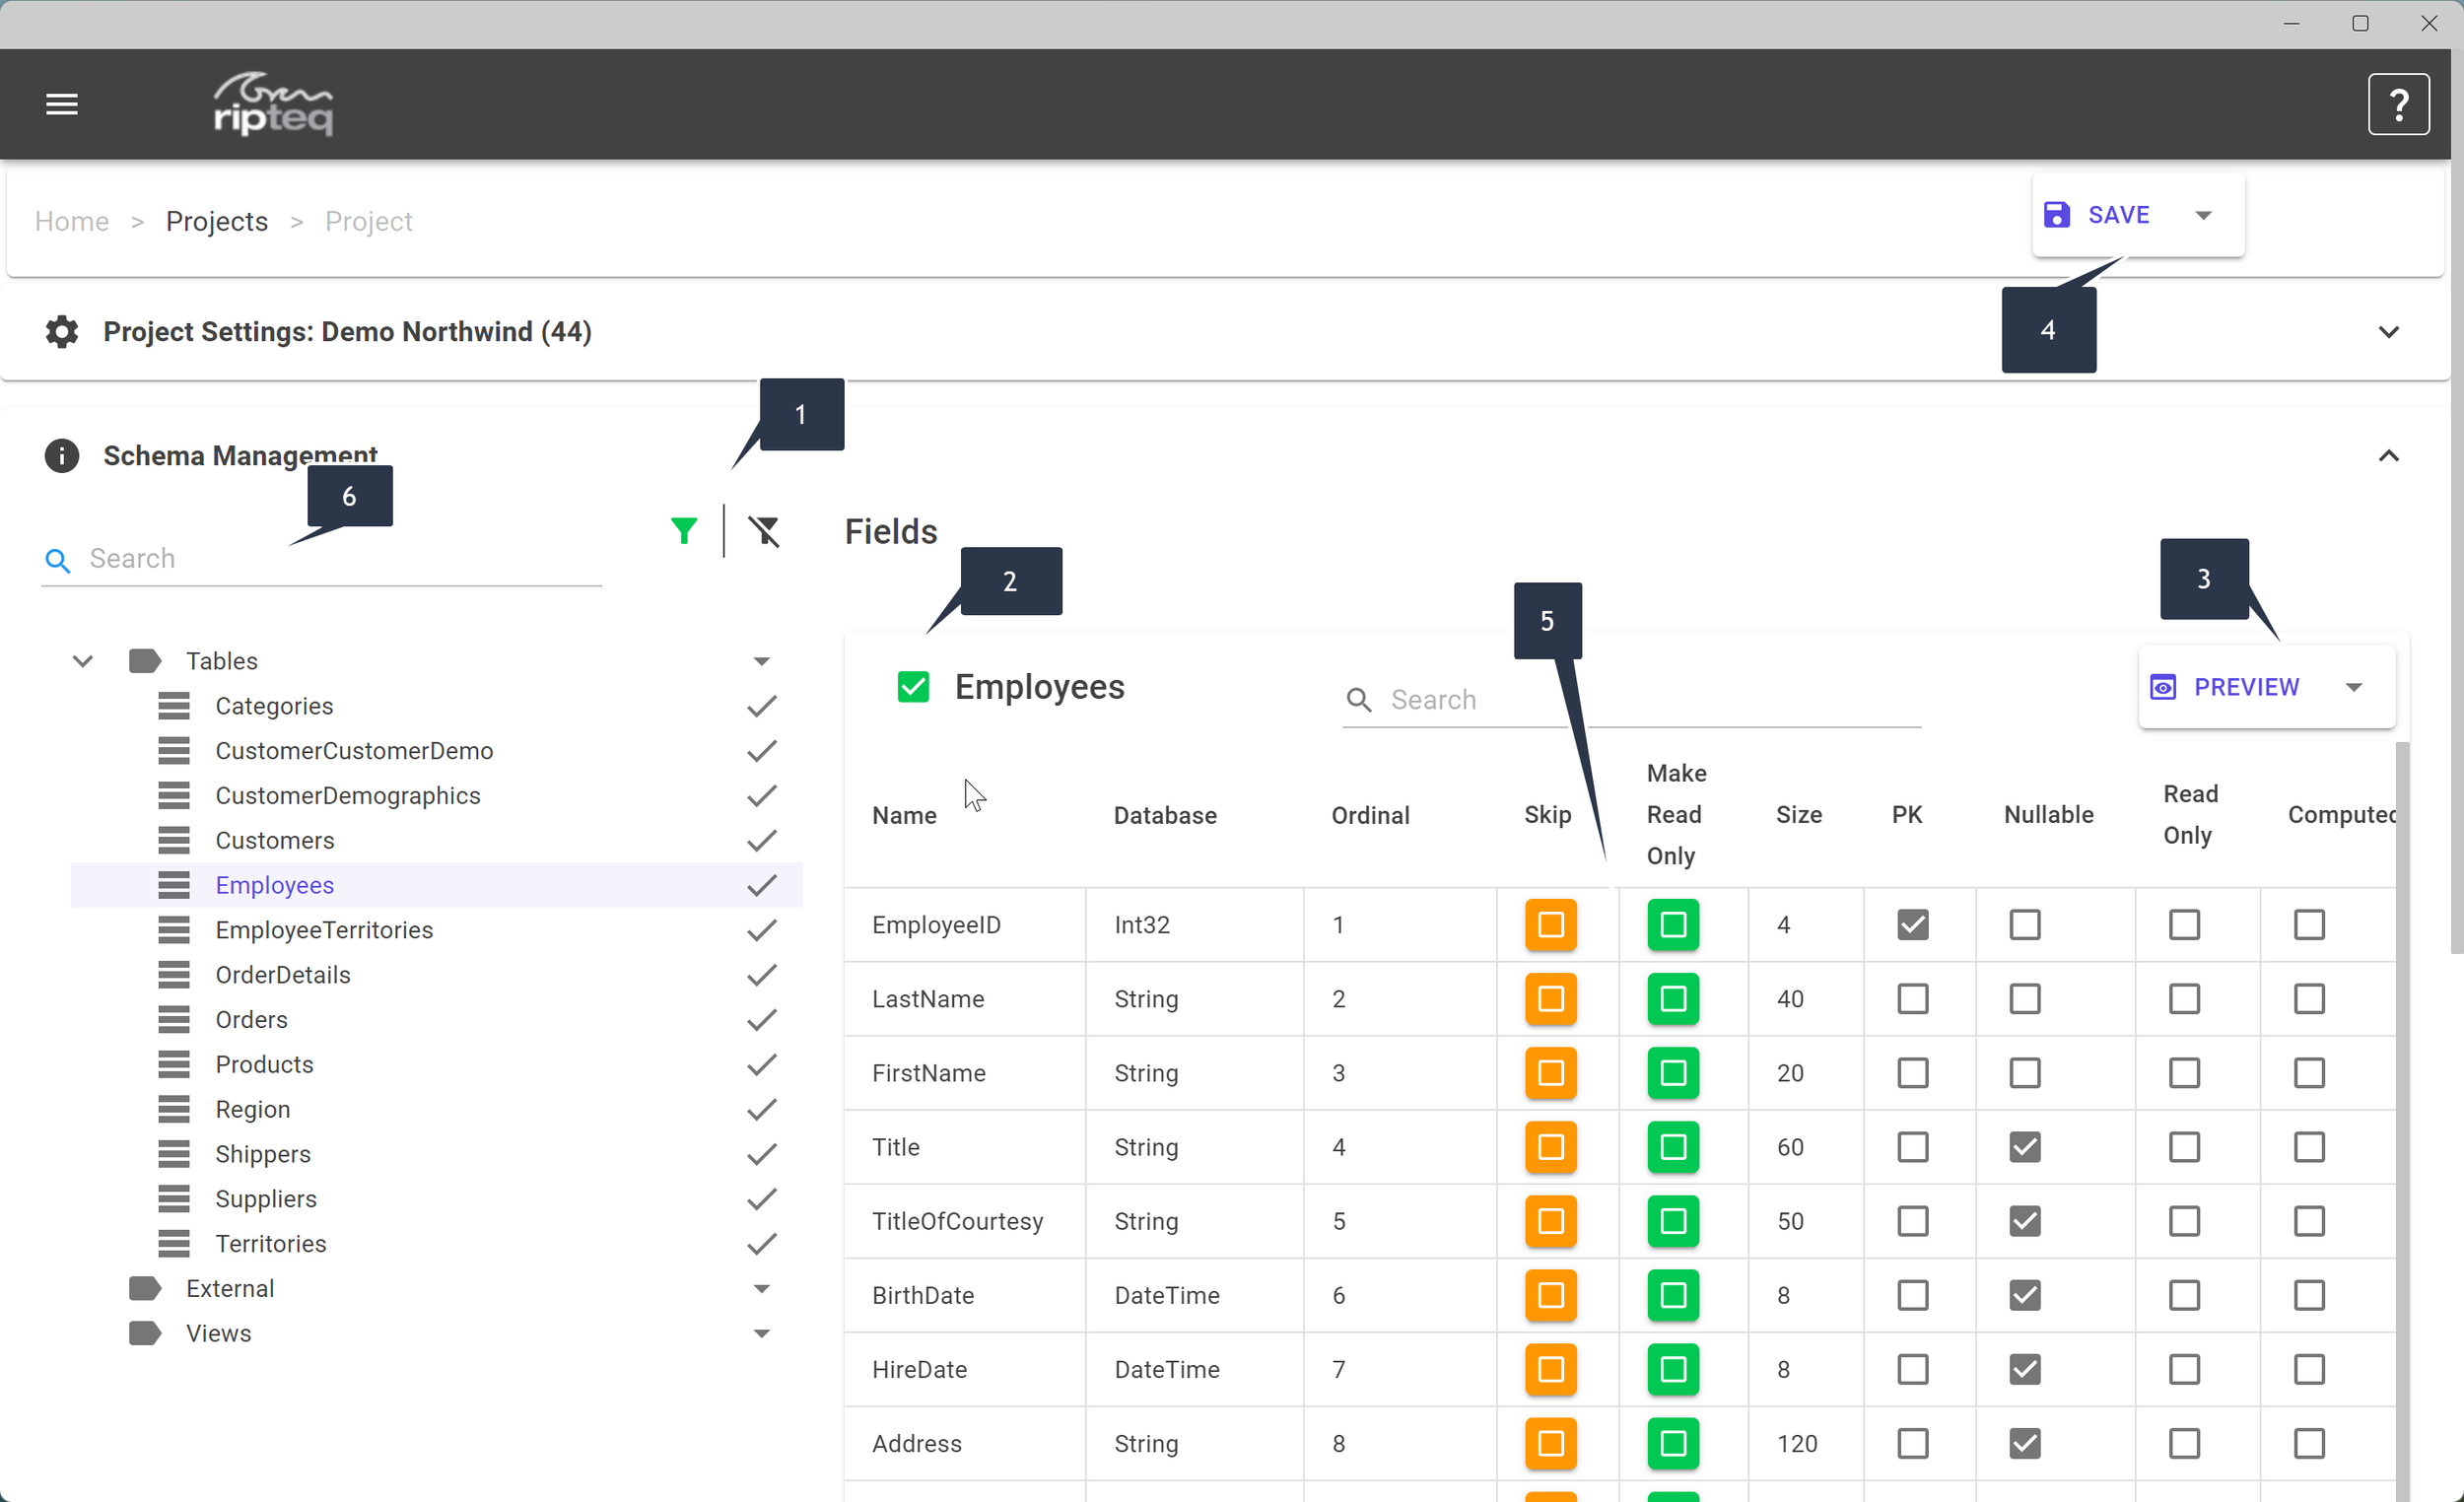
The Schema Tree shows all the tables, external and views found in the linked database. You can filter this view using the search box. The ‘tick’ shows this entity will be included in the file generation. You can excluded an entity by ticking the checkbox next to the heading of the entity name [2].
The filter buttons next to the Search box will toggle between showing/not showing excluded items.
When you select an entity (such as Employees), the right hand side of the screen will show the schema, as well as the mapped type (ie. nvarchar => string). You can choose to ‘Skip’ a field, or turn a field into a read only field by clicking the coloured checkbox button in these columns [5].
You can preview the generated file by clicking the ‘Preview’ button [3]. This will show you both the generated code, and the save location. Clicking the dropdown button will allow you to also preview the Instructions for this entity, as well as perform a selected Sync for this entity only (say, if you have added a field to the Employees table, you can re-sync just this table).


Generating Output
With the project (or projects setup), you can now generate the code files. You can do this for a Project, or a group of Projects within a Solution.
To do for a project, you can select the main dropdown button, and choose either ‘Sync & Generate Output’, or just ‘Generate Output’ if the solution does not require a new sync with the database schema.
This will generate the code files into the Output folder designated in your Project settings.
You can also do this from the Projects screen at either the Project Level, or at a Group Level. If you have lots of projects within a solution that use the same Database connection, the Solution sync will be a lot faster as the Schema Sync will only happen the once.

Other Features
A quick list of other features include:
Exporting Templates to a JSON file (within the Template)
Importing a Template from a JSON file (from within the Templates screen)
System > Backup and Restore - this allows you to backup all your settings, and also to restore a previous settings file.
Create > Info - this is a screen that will show more dynamic content over time
Conclusion
Thanks once again for downloading RipteqSQL. Please reach out if you have any questions, or feedback.
Cheers!